Engine-Turned Finishes
 Making those overlapping shiny scale-like whorls on metal is easier than it should be. Usually the panel that needs finishing is aluminum or stainless steel but “engine turning’ works on any metal. The trick is to make a set-up that allows easy and repeatable indexing and to select an abrasive that gives the finish you want. A drill press is excellent and the only limitation is that the depth of the throat equals the maximum depth of the panel to be finished.
The set-up: Clamp a long bar or piece of wood to the table of the drill press to act as a fence. It should overhang on both sides.  Tape a long steel rule or a tape-measure to the fence. Make a mark on the panel to use as reference. I work right to left so, for convenience, my reference mark is at the extreme left side of the panel. Swing the head of the drill press as far to the right as it will go and still have the tool land on the panel.
The Process: Lower the quill to make firm but light contact with the panel. Count to three and release. Observe! Consistency is the hallmark of a good engine turned finish. Practice a few times until you are satisfied with the count (duration) and the pressure and then place the panel against the fence with the reference mark lined up with an appropriate mark on the fence and begin. After each new whorl, move the panel reference mark to the next division (i.e. each ¼” or whatever your chosen spacing) on the tape and repeat. When you come to the end of the first row, swing the head of the drill press out for the next row. Align your reference mark with an appropriate location, usually one half step from the first location, on the fence and proceed.
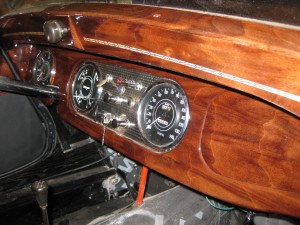
The Tool: Depending on the size of the whorl you want you can either buy a commercial tool or make one. Some of the commercial tools are like wire brushes others are more like electric erasers with a collet and replaceable  abrasive rod. The Plus 4 dash panel in the illustration has ¼” whorls and was done with the collet type tool pictured. As an alternative to a commercial tool you can use almost anything that can be chucked into the drill press that has the desired diameter and a liquid abrasive. For one of my early attempts I turned dowels and glued leather discs on the ends. Valve lapping
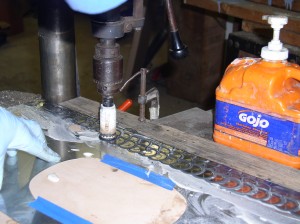
  compound was the first abrasive I tried. It worked great but when one of the leather discs came off I discovered that the dowel alone worked just as well. Pictured is the quick-and-dirty tool I now use for larger whorls. It is just a hole-saw with the center drill removed and filled with a few plywood plugs. The abrasive is pumice laden hand cleaner. Hand cleaner works well, is usually in the shop anyway and because it is liquid, it keeps the work cool.
The material: I prefer stainless steel to aluminum but either metal works fine. A standard mill finish gives good results but don’t expect scratches or dings to miraculously disappear. This is a decorative technique not machining. For best results, polish the metal bright before engine turning.
For small parts like instrument panels and engine bits this system works very well. Large panels are more difficult simply  because most shops don’t have a drill press with a deep enough throat. In a moment of inspiration I once bolted my drill press upside down to a ceiling beam so that I had an unobstructed table for engine turning steel for a scuttle. (We do silly things when we are young.) Engine turned aluminum is available commercially if you prefer to buy it or if the part you want to finish is too big. The obvious caution with pre-finished material is that you have to be very careful when handling it.